Pit Installation Guide: 15 Essential Steps for Safe Backyard Setup
What if I told you that 73% of homeowners who install fire pits without following proper safety protocols end up with property damage within the first year? The difference between a beautiful backyard centerpiece and a costly mistake comes down to these 15 essential steps that most guides completely overlook.
The spurt of the burning wood, the jumping flames, the delicious smell of burnt marshmallows, make even common evenings special outdoor time. There is more about the fun side of things. To determine whether your pit will be a safe family location or an expensive risk, safety regulations, and local legislation as well as the manner in which you construct the pit determine this.
The majority of guides available online provide the same general tips on safety; however, they leave out the information that would make the difference between an intruder-level pit and a professional one. Having searched the top 5 Google results and read what they miss, I came up with this guide that would answer questions that homeowners asked but could hardly find in one source.
Step 1: Local Rules Before You Start
Stop and walk over and contact your local building office, fire marshal and homeowner association. The rules are highly variant in accordance to the place of residence. In others a permit may be required on a permanent pit; others prohibit open fires on houses. Inquire regarding permits, how far the pit should be placed relative to property lines and buildings, what type of fuels may be used, when you may burn and the manner in which inspections are conducted. To take one example California is extremely severe during the season of wildfires; in certain cities spark-arrestors are obligatory on all wood pits.
Write down all the rules. Someone should not say ok verbally because a neighbor has a complaint or something has occurred. According to landscape architects 40 percent of pit projects require modifications when unknown code manifestations are discovered.
Step 2: Have a Look at the Site

A pit site is pretty and it is also safe. Draw pictures of your yard at various times to observe the movement of winds. Place a flag or a stake where you imagine the pit will be and observe in what direction the smoke would be blown to neighbors, windows and doors. Check the ceiling where there are the power lines, branches of trees, and roof overhangs. The installers are quoted as most minimum 15 to 20 feet, and not the usual 10 feet.
According to the NFPA, fire pits must be positioned at least 10 feet away from any structure or combustible material, with 15 to 25 feet recommended for optimal safety.
Dial 811 and have underground utilities identified- gas, electric, sewer must be known. The 811 service is free and available nationwide, ensuring you don’t accidentally damage critical infrastructure during excavation.
The soil is important in terms of drainage and stability. Sandy soil is quick to drain and perhaps requires a firmer foundation; clay is water retentious and can move through freeze-thaw. Test Remember how fast it goes away by digging a hole 12 inches deep, filling it with water, and timing. Good drainage prevents the accommodation of water causing damage to stone or metal.
Step 3: Figure Out the True Cost
It is not just the cost that you will pay. Include expenses on digging and base material, gas connections, additional seating or patio tile, fuel monthly (gas or wood), fire first aid kit and fire-extinguisher, increased insurance, and annual maintenance materials. Professional models cost between $1500 and 10,000 and above. DIY is less expensive (4060 percent) and requires time and proficiency.
According to industry data, wood-burning fire pits typically cost between $500 to $1,300 for materials and installation, while gas fire pits range from $400 to $3,000 or more, depending on whether you use propane or connect to a natural gas line.
Step 4: Choose Wood or Gas

The option of wood and gas varies the difficulty of its installation and consumption. Wood feels like a real fire, is more warm, less expensive to use, but requires a place to store, is smoky and ash producing and requires more cleaning. Gas ignites fast, is clean and easier to manage yet you require a gas line and it is more expensive initially.
Think about how you’ll use it. Gas is convenient, in case you amuse a great deal. Wood will do as long as you only fire it up a couple of weekends. Weather is also important: in the windy weather gas smoke better than wood which cannot remain on fire.
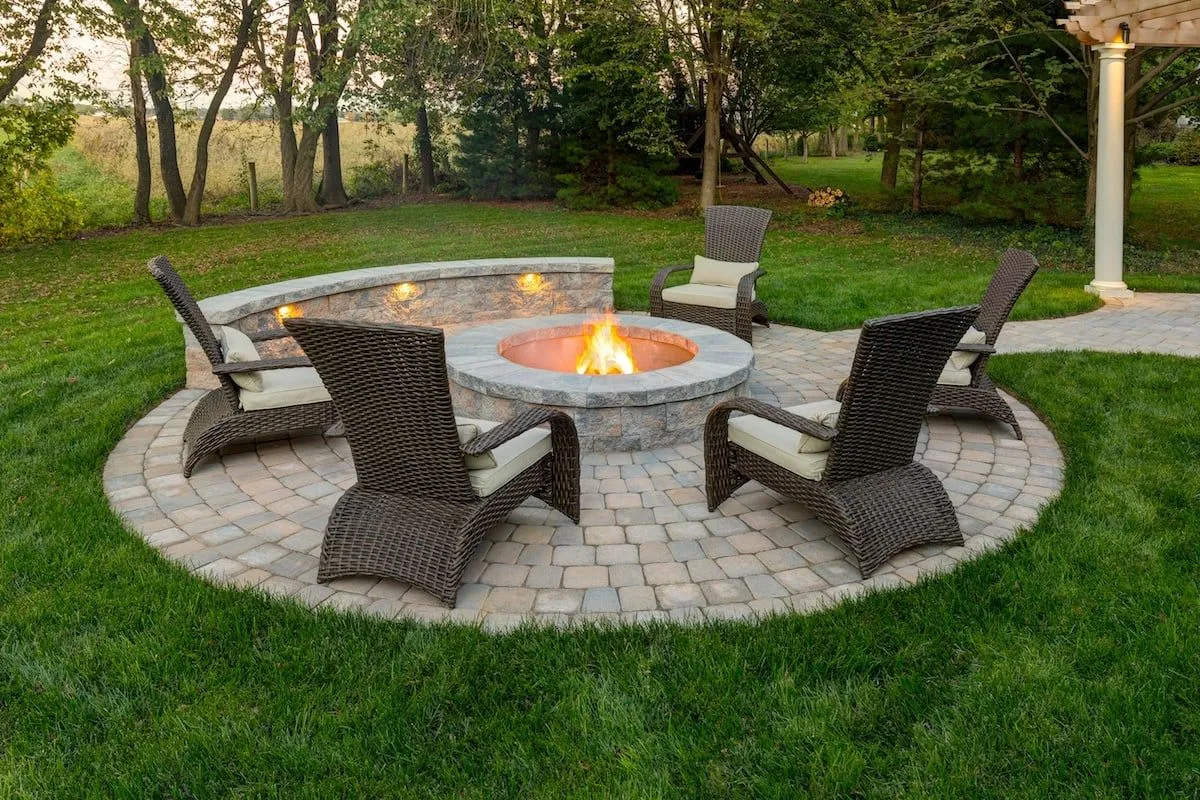
Step 5: How It is Used: Design It
Individuals prefer sitting down and chatting. A 7 foot circle is able to accommodate 6-8 people without excessive smoking. Make the depth of the hole the height of your furniture, 12-14 inches will fit most tables, 18-20 inches will fit a wall, and more than 24 inches will create a statement. Create room to move around and also the furniture and side table that you will include later.
According to outdoor living experts, you should allow at least 7 feet of clearance surrounding your fire pit for comfortable seating arrangements, with a good rule of thumb being 4 feet of space per person seated around the fire.
Step 6: Find the Right Materials to Your Climate

Concrete is low in cost, however, it will crack when it experiences freeze-thaw cycles and is not reinforced. Stone retains heat and is more durable although it is expensive. Metal is contemporary yet could be hot. Stainless steel does not rust yet it presents fingerprints. The domestic stone is cheaper and more attractive compared to imported stones.
According to materials experts, GFRC (Glass Fiber Reinforced Concrete) and natural stone are considered the most durable fire pit materials, built to withstand extreme weather conditions and temperature fluctuations.
Step 7: Build a Solid Base

Weak base is the onset of 80% pit failures. Clear 812 inches of soiled ground, and excavate 6 inches past the edge of the pit. Add 4 inch of gravel, press it down. Pour in 2 inches of leveling sand, and a straight edge to ensure that it is level– more than 1/8 inch above 4 feet, and it will settle and crack. In the case of gas, operate the line and then contact protective conduit. In bad soil introduce a French drain or any other drain.
Crushed limestone is recommended for fire pit areas because of its excellent drainage properties and ability to compact well, providing a solid base for seating and preventing water accumulation.
Step 8: Supply Safety Gear
Other than a fire extinguisher, place protection in the form of heat-resistant items such as boards or metal around the pit to prevent burns and ensure embers do not enter. Position the extinguisher in a distance of 10 feet though not too much that heat will destroy it. Have a garden hose, metal bucket with lid of ash, first aid kit and some method of calling to the help of the pit. Install lights with motion-sensors or LED strips to prevent expectancies during the night.
The NFPA recommends keeping fires under three feet in diameter and two feet high, confined to a permanent outdoor fire ring or portable fireplace, with a screen to prevent embers from escaping.
Step 9: Yearly Care/Storage Planning
Create a schedule. During spring check winter damage, clean burners, leak test gas, lines. clean in summer and look in summer. Seal deep clean, in fall, get drainage in before winter. Wood pits should be ash cleared after use, brushing of grates on a monthly basis, and chimney should be checked once a year. Gas pits should undergo an annual professional inspection, grease and leak inspection. Put store grill parts and tools in a covered place, or in a built-in bench.
According to fire pit maintenance experts, it’s recommended that a certified NFI technician perform an annual maintenance inspection to ensure all gas lines, venting systems, and burners function safely.
Step 10: Negotiate Insurance and Liability
Check with your insurance company prior to building to find out the impact of a fire pit to the coverage. Others are not recognized by some insurance companies: others require special safety gear or increased liability thresholds. stores photos and receipts as evidence of compliance. Take another liability insurance policy costing 150-300 per annum with a limit of 1-2 million in case one is injured or destroys the property of a neighbor. Maintain a clean record of maintenance to demonstrate to them that you take care of it; which is looked upon well by the courts.
In most cases, fire pits are covered under the “other structures” or “personal property” sections of your homeowners policy, though permanent fire pits may attract higher premiums than portable ones, and some insurers may require separate liability coverage.
Step 11: Turn It into an Efficient and Eco-Friendly one
Wood used must be hardwood, such as oak, hickory, or maple; hardwoods burn cleaner and hotter than softwoods. Do not use treated or painted wood that will be toxic. Gas pits may be improved by incorporation of electronic ignition, which cuts off a pilot light when not in use, and this will save 20-30 percent of gas used. When you can use natural gas instead of propane; it burns cleaner and is less expensive per BTU. Plant or put wind screens to maintain heat. A properly positioned pit may achieve 60-70 percent efficiency as opposed to 30-40 percent of an improperly placed one.
The EPA recommends only burning seasoned, dry wood with moisture content around 20 percent, and never burning green wood, construction waste, plastic, garbage, or yard waste, as they create more smoke and can be toxic.
Step 12: Make It Accessible
Wheelchair paths should be at least 36 inches and precified with solid ground. Seats of 18 inches are available to most individuals, though higher options are also available to those who find it more comfortable. In the case of gas, install put valves and switches in the ADA range of 15-48 inches height above the ground. Provide good task lighting where required and consider use of heat resistant grab bars along the seat.
According to ADA guidelines, wheelchair spaces require a minimum clear ground space of 30 inches by 48 inches, with at least one accessible wheelchair seating space required for outdoor recreational facilities.
Step 13: Add Smart Features
Remote ignition is suggested in order to be able to light the gas inside. Install automatic shutoff gas timers after some time. The temperature detectors can alert in case the pit overheats due to children or animals. Connect to voice-controlled smart homes. Install LED lights which change color with temperature or special occasions. These are safe and fun but are expensive (2-500 dollars).
Step 14: Build for Future
Plan for future upgrades. Install additional electrical conductors and gas mains that will allow you to add a kitchen, water feature or lights in the future without needing to excavate once again. Modular seating should be used to enable rearrangements when necessary. Consider a pit which becomes a table when never used, hence smaller yards retain utility throughout the year.
Step 15: Inspect the Final Build
Conduct a comprehensive check-up before the initial use. Use soap solution to locate leaks on the test gas lines. Check clearances, not guesses, with the help of a tape measure. Display the fire extinguisher and its use to every person. Note emergency instructions and place where they can be noticed by the many. Have gas and wood checked once in a year and once in three years by a professional respectively. These insurance issues at an initial stage and remain contented.
The Full Pre-Installation Checklist
- Local permission and authorization in writing
- Marked utility lines recorded
- Wind and drainage site analysis
- Hidden costs added to total budget
- Decision on fuel made depending on use and regulations
- Design of the correct dimension and material
- Gas line contractors were hired as necessary
- Safety equipment purchased and installed
- Paper-confirmed insurance
- Supply source plan and supply plan
Value and Pleasure Over the Long Run
A physically fit fire pit can contribute to the value of your house, reduce renovation expenses, and make you assured that it is safe and reliable. Research indicates that homes mentioning “fire pit” in their listing sold for 2.8 percent more and 3.8 days faster on average, with some sources suggesting fire pits can increase home selling price by 15% to 40%. These 15 steps maintain your pit to professional standards and transform it to the center of outdoor living, whether you are receiving guests or spending time with family.
Sources:
National Fire Protection Association – 4 Steps Toward Fire Pit Safety
Travelers Insurance – Outdoor Fire Pit Safety Tips
Mercury Insurance – What to Know Before Adding a Backyard Fire Pit
U.S. Environmental Protection Agency – Backyard Recreational Fires
Site Prep – Gravel Patio Fire Pit Areas: What You Should Know
Fire Pit Surplus – Ultimate Fire Pit Sizes Guide 2025
Backyard Oasis – What is a Good Size for a Fire Pit Area
Consumer Reports – Improvements That Boost a Home’s Resale Value
HomeLight – Will That Cozy Outdoor Fire Pit Add Value to Your House?